People and Faces
Lifebook can recognize the people in your photos and videos. It finds faces, groups the ones that appear to belong to the same person, and lets you name people — so you can later see every photo of someone, filter the timeline by them, or find them through search. Everything happens on your device; your photos and faces are never uploaded.
Face recognition is on by default, so the People button is in the main menu from the start. Nothing is analyzed until you set it up, though: Lifebook needs to download a recognition model first, and it always asks before downloading it.
The controls that switch face recognition on and off are in Settings.
On this page: Setting up face recognition · Scan your existing library · Removing all face data · The People page · Confirming and naming people · Merge suggestions · Regrouping faces · Hiding people · Removing a person · Opening a person's photos · Recognized faces on photos · Filtering by person · Finding people by name in search · How face recognition works
Setting up face recognition
The first time you open People, Lifebook asks for your consent in a Set up face recognition dialog. It explains what setting the feature up means before anything happens: Lifebook will look for faces in your photos and videos, group the ones that look like the same person, and store the resulting face data on this device. Nothing is uploaded, and getting started needs a one-time model download of about 249 MB.
- Accept, and Lifebook downloads the model and then scans the photos and videos already in your library, so People is not empty. Both steps show progress and can be cancelled.
- Decline, and face recognition stays switched on but does nothing — no faces are analyzed and no face data is created. Lifebook asks again the next time you open People.
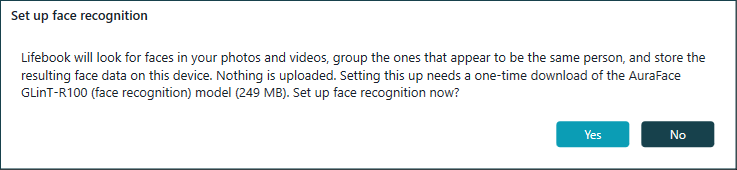
Once the model is installed, new photos and videos are scanned for faces automatically as you add or import them. When that background work finishes, the status bar briefly shows how many faces were found, with a shortcut to review them in People.
Scan your existing library
Automatic scanning only covers photos and videos added after the recognition model is installed. Lifebook scans your existing library once for you, right after the first model download, so you normally do not need to do this by hand.
To scan again later — after cancelling that first scan, or after importing a large batch while face recognition was switched off — use the Scan library for faces button in the People settings. It becomes available once face recognition is on and the model is downloaded. Lifebook then detects faces in your existing photos and videos, including images inside photo albums and the preview frames of videos.
A progress window shows how many items have been scanned and lets you cancel at any time. Faces found by the scan are grouped and reviewed exactly like faces found during import. The scan also restores any face thumbnails that have gone missing — for example after restoring a backup — so your People page stays complete.
When a scan finishes, Settings shows how many photos and videos were processed, along with an Open People button that takes you straight to the results. A cancelled or failed scan shows no result message.
Removing all face data
Directly below Scan library for faces you will find Remove all face data, which clears everything face recognition has learned in one step: all people, all face signatures, and all face images stored on this device.
Lifebook asks you to confirm first, because this cannot be undone. Removing all face data also discards your review decisions — confirmed faces, faces you marked as not being a person, and merge suggestions you dismissed.
What stays untouched:
- Your photos and videos are kept. Nothing is removed from your timeline.
- Face recognition stays switched on.
- The downloaded recognition model stays installed.
Afterwards the People page is empty and Settings shows the confirmation All face data removed. Because your photos are still there, you can start over at any time: run Scan library for faces again and Lifebook finds the same faces once more — though the names you had given people, and the review decisions you had made, are gone for good.
The People page
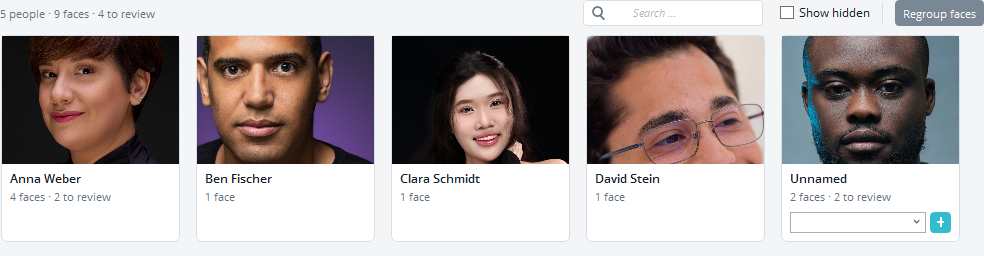
Open the People page with the People button in the main menu. The page header shows how many people, faces, and faces waiting for review you have, with Regroup faces and Show hidden on the right.
Each person card shows a representative face, the person's name, and how many faces belong to them — plus how many still need review, when any do. Cards resize to fit the window. Cards Lifebook has not named yet are labeled Unnamed and include a name box with an Add button, so you can name people right from the grid.
Use the search box at the top right to narrow the grid to people whose name matches what you type; clear it to bring everyone back.
Before any faces have been found, the page explains that new photos and videos are scanned automatically and offers a Scan library for faces button, so you can start the first scan without going to Settings. If the recognition model is not installed yet, Lifebook asks to download it first. When a search matches nobody, the page says so instead — clear the search box to bring everyone back.
If faces are still being processed in the background, an action on the People page may briefly show Waiting for background face processing… before it completes.
Confirming and naming people
Lifebook groups similar faces and shows each group as a card in the People grid. Naming and reviewing works like this:
- Naming an unnamed card: type a name into the box on the card — Lifebook suggests existing names as you type — and click Add. This immediately confirms the card's cover face as that person; the group's remaining faces become suggestions you can confirm or reject one by one afterwards.
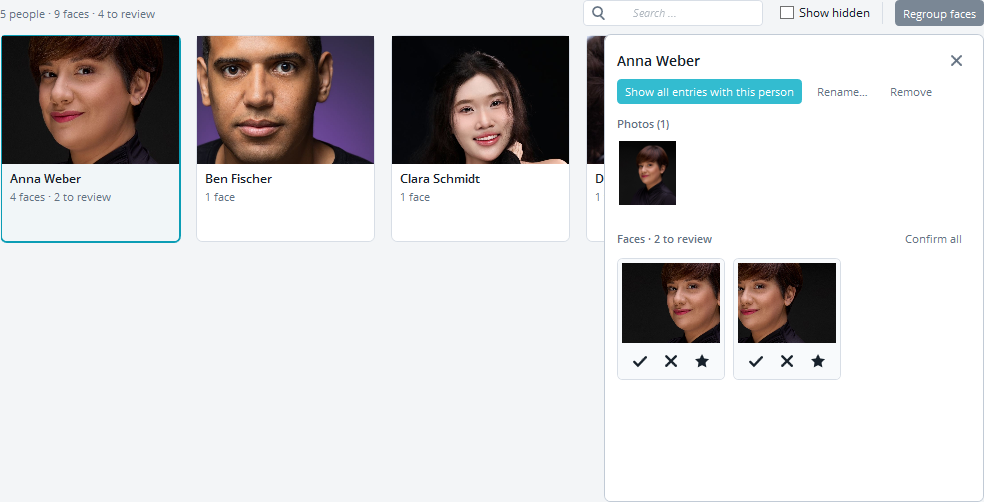
- Reviewing suggested faces: click a person card to open their detail pane and look at the Faces section — a review queue listing only the faces still waiting for your decision, with the number left to review in its heading. For each face, use ✓ to confirm it, ✗ to say it is not this person, and ★ to make it the person's cover picture; ★ is highlighted on the face that is the cover already. Confirm all accepts every suggestion for that person in one step.
- Renaming a person: right-click a card, or use the Rename… button in the detail pane, to change a person's name.
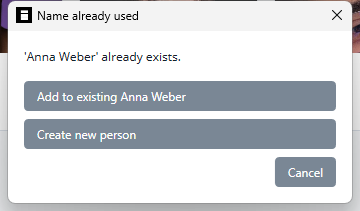
If you enter a name that is already in use — while naming or renaming — Lifebook asks what you mean: Add to existing merges this card into that person (its faces then appear in that person's review queue), while Create new person keeps a separate person with a numeric suffix such as "Mike (2)".
Confirming or rejecting a face shows a brief status message at the bottom of the page; Confirm all also offers an Undo that returns everything to the review queue. The message dismisses itself after a few seconds, but stays for as long as your pointer is on it, so an Undo never disappears while you are reaching for it.
Merge suggestions
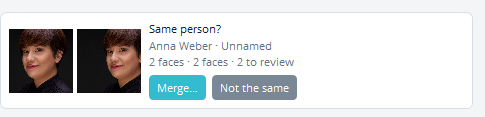
When two people on the People page look like they might be the same person, Lifebook shows a Same person? suggestion card above the grid, comparing the two — their faces side by side, with both names and both face counts below the question, so you can see how much of each person is at stake before deciding. Choose Merge… to open a comparison dialog: it shows up to three faces from each person, their names and face counts, and a note that all of their faces will be combined into one person — your photos themselves are not changed. Confirm there to complete the merge, or cancel to back out. Choose Not the same to dismiss the suggestion; Lifebook remembers your choice and will not suggest that pair again.
Regrouping faces
Face grouping keeps improving as you add more photos. If several separate cards show the same unnamed person, or you want Lifebook to take another pass at recently added faces, use the Regroup faces button at the top of the People page. Regrouping only affects unnamed cards — people you have already named keep their faces and are not changed.
Lifebook also regroups automatically after a library scan, so you do not normally need this button right after scanning.
Hiding people
Not every detected face is someone you want on your People grid — a stranger in the background, for example. Right-click a person card and choose Hide to remove it from the grid. Hidden people are not deleted; their photos and faces are kept. A brief message at the bottom of the page confirms the action and offers an Undo in case you change your mind.
To bring a hidden person back, turn on the Show hidden checkbox at the top of the People page — the number of hidden people is shown next to it. Hidden cards stay in place with a dimmed picture and a Hidden label on it. With hidden people visible, right-click a hidden card and choose Show.
Removing a person
Right-click a person card, or open their detail pane and use the Remove button, to delete the person. Lifebook asks you to confirm first. Removing a person does not delete any photos or videos — their faces simply become unnamed again.
Opening a person's photos
Click a person card once to open their detail pane. It starts with a Photos section — every entry with one of their confirmed faces — followed by the Faces review queue described above. Click a photo there to open it in the overlay view, or right-click it and choose Set as cover to make the person's face in that photo their cover picture. Each section shows the first 24 items and has its own Show all button, so expanding your photos leaves the review queue as you left it.
Drag the pane's left edge to make it wider or narrower — useful for seeing more photos at once on a large screen. Lifebook remembers the width you choose.
To close the pane, use the ✕ in its top right corner or press Escape. On a narrow window, where the pane floats over the cards instead of sitting beside them, clicking the page behind it closes it too.
Double-click a named person's card to open the timeline filtered to their photos and videos. You can also select a card and press Enter, right-click it and choose Show all entries with this person, or use the Show all entries with this person button at the top of the detail pane. This works only for people with a confirmed name — on an unnamed card the menu entry and the button stay greyed out, so name the card first.
Recognized faces on photos
When you open a photo in the overlay view, Lifebook can draw a frame around each detected face. Confirmed faces get a solid, bright frame with a name label; faces still waiting for review get a dashed frame labeled Unconfirmed. Clicking a confirmed face's name label filters the timeline to entries with that person.
Face frames are hidden by default when you open a photo from the timeline, and shown by default when you open it from the People page. Use the Show recognized faces button in the overlay's tool strip to show or hide them at any time — the button only appears on photos with detected faces.
Filtering by person
The filter column includes a People Filter section listing all confirmed people, each with their face thumbnail. Select one or more people to show only entries where they appear. This works the same way as filtering by tag or year.
Finding people by name in search
You do not need the People page to find someone. Type a person's name into the main search box on the timeline, and Lifebook shows entries containing that person alongside any keyword matches — the same box you already use to search text and tags.
How face recognition works
Face recognition runs in two stages, both entirely on your device.
First, Lifebook finds face regions using the face detector built into Windows; for videos, it checks the preview frame. Each detected face is then analyzed by the AuraFace recognition model (published by fal.ai), which turns the face into a numeric signature that can be compared with other faces. Very small faces are skipped because they cannot be recognized reliably.
Faces with closely matching signatures are grouped into one person, and groups that look very similar appear as merge suggestions. Your decisions refine the grouping: a confirmed face anchors its person, and a rejected face is remembered so it is not suggested for that person again.
The recognition model is downloaded once (about 249 MB) from Hugging Face, a hosting service for AI models — the only network access face recognition ever makes. The downloaded file is verified before use, and you can remove it again at any time. Face signatures and face positions are stored in Lifebook's local database; the small face crops shown on cards are stored in the app's data folder. Photos and face data are never uploaded.